Warm weather – F I N A L L Y.
This weather also means most colleges are out of school and high school is almost out. Basically, graduations are happening and then we get summer!!!
I’m really, really wishing I was free from any and all responsibilities for a few months. Like many grads. Just a few months. I could deal with that. Call off all routine and enjoy some lazy summer days… dream on, right?
Are you attending any grad parties? Throwing a grad party? Graduating yourself?
I have a few really cute ideas for you…
Graduation Caps

I’m envisioning these as a cupcake topper, but they’d be super cute on their own!

Ingredients:
- 1 package (16 oz) Chocolate CANDIQUIK® Candy Coating
- 1 box Graham Crackers – break into 1″ squares
- 24 mini peanut butter cups candies (Reese’s)
- Cake Writing Icing
- Round Sprinkles
Directions:
- Cut graham crackers into 1″ graham squares
- Melt CANDIQUIK Candy Coating in tray according to directions on package.
- With a fork, dip graham cracker squares in CANDIQUIK; place on wax paper to dry. Place a round sprinkle in the center of each graham cracker while coating is still wet.
- With the cake writing icing, pipe on the tassel.
- Place unwrapped peanut butter cups upside-down. Use a dab of CANDIQUIK Candy Coating to affix dried chocolate graham cracker squares to bottoms of peanut butter cups.


or…serve as pops!

Or, if you want to take it a step further. Make these…
Marshmallow Graduates

Ingredients:
- 1 package (16 oz) Chocolate CANDIQUIK
- 1 bag small pretzel twists
- 1 bag large marshmallows
- Brown sprinkles and/or mini chocolate chips
- 24 mini peanut butter cups candies (Reese’s)
- 1 box graham crackers
- Cake writing icing
- Round Sprinkles
Directions:
- (Follow the steps above to make the graduation caps out of the graham crackers, sprinkles, p.b. cups, and writing icing)
- Melt CANDIQUIK® Candy Coating in Melt and Make Microwavable Tray according to directions on package.
- Insert a toothpick into a marshmallow; dip one side, then the other side into melted CANDIQUIK® Candy Coating to look like a graduation gown, leaving center of marshmallow uncoated for chest of graduate.
- Place dipped marshmallow (for body) on top of a pretzel twist.
- Decorate the face of each graduate using a toothpick and CANDIQUIK. To create hair, dip just the top of the marshmallow in Chocolate CANDIQUIK and sprinkle with mini chocolate chips or brown sprinkles to create “hair”.
- Place this marshmallow on top of the other marshmallow (body).
- Once dry, affix the graduation cap on top of the graduate with a dab of CANDIQUIK Coating.


Ok…be patient with me, I have one two more treats for you!
Graduation Penguins


Ingredients:
- 1 package (16 oz) Chocolate CANDIQUIK® Candy Coating
- 1 box Graham Crackers – break into 1″ squares
- 24 mini peanut butter cups candies (Reese’s)
- Cake Writing Icing
- Round Sprinkles
- 1 bag large marshmallows
- Candy Corn
- Sour Patch Kids Candy
Directions:
- (Follow the steps above to make the graduation caps out of the graham crackers, sprinkles, p.b. cups, and writing icing)
- Melt Chocolate CANDIQUIK Coating according to the package directions.
- With a toothpick, dip the marshmallow diagonally on each side to create the chocolate “V”. Set on wax paper to dry.
- To attach the beak, place a dab of chocolate CANDIQUIK on the candy corn and position on the marshmallow, hold in place until set.
- Once dry, place two sourpatch kid candies on wax paper as the feet. Attach these to the marshmallow penguin body using a dab of
chocolate glueCANDIQUIK. - Place a dab of CANDIQUIK on the top of the penguin’s head and attach the graduation cap. Draw two dots on for the eyes with white cake writing icing.

Pretzel Diplomas
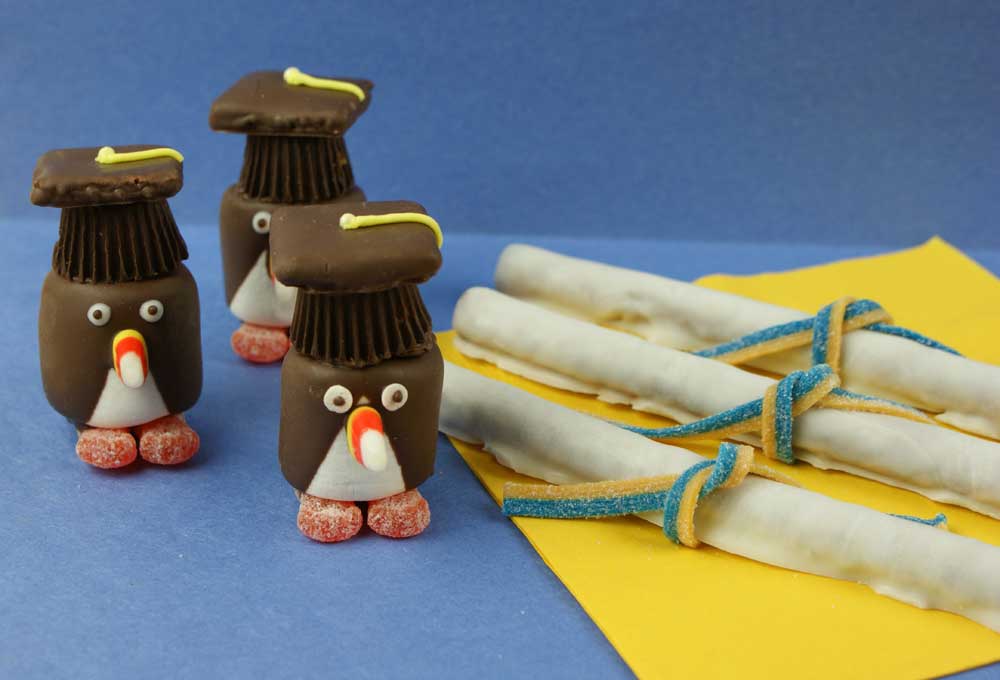
One last little idea - a cute touch – easy, and yummy-licious – pictured above with the penguins…
Directions:
- Simply coat each pretzel rod completely in Vanilla CANDIQUIK and place on wax paper to dry.
- With a knife, cut the airhead candy into strips.
- Tie the strips of candy around the middle of the pretzel rod to complete the diploma.


Leave a Reply