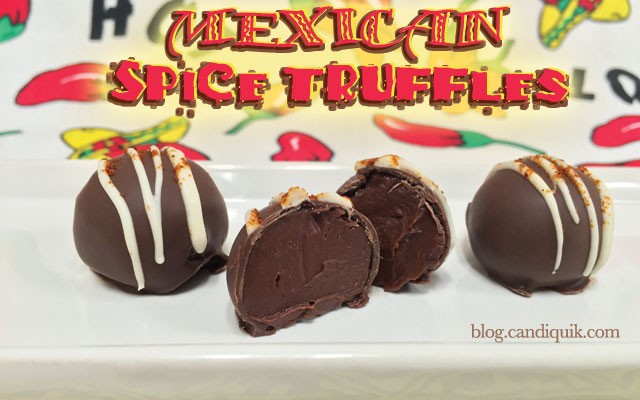
Posts tagged ‘gluten free’

May 6th, 2011

Flourless Chocolate Torte

Pin It


read more »

June 16th, 2010

Gluten-Free Chocolate Dip’d Peanut Butter Cookies

Pin It

Coffee with too much cream and sugar, a new pair of jeans, driving around with the windows rolled all the way down…radio blaring, the smell of fresh linens, grilling outside with friends, sitting on a patio with a bottle of chardonnay, working out just to eat ice cream, getting home from the beach all day – realizing you should have put the spf 30 on versus spf 4 dark tanning oil, peanut butter and chocolate, ahh! the simple joys in life.

Just randomness but here ya go:

 Simple! Gluten-free Chocolate dipped P.B. Cookies!

I know what you’re thinking: gluten free “cookies”…sacrificing taste/texture…well, not this time, try it- trust me :) I’m not even one who suffers with celiac and I love ‘em.

read more »

May 10th, 2010

Gluten-Free recipe to swear by! Gluten Free Chocolate Cake!


Something to talk about, delicious, decadent, flourless chocolate cake! I decided to make this recipe because May is Celiac Awareness month!

I’m sure we have all encountered a friend, family member, or even know personally about a gluten allergy. For those who are not sure exactly what Celiac disease is, I will go into a bit of detail.

Celiac disease (CD or gluten intolerance) is a genetically linked disease with an environmental trigger. In people with CD, eating certain types of protein fractions, commonly called gluten, set off an autoimmune response that causes damage to the small intestine. This, in turn, causes the small intestine to lose the ability to absorb the nutrients found in food, leading to malnutrition and a variety of other complications. The term “gluten” is basically a generic term for the storage proteins that are found in grains.

And the good news is, CANDIQUIK is gluten free.

For more information and info provided here, see: http://www.celiac.com ,  http://www.celiac.comhttp://www.csaceliacs.org

There are so many things that you can do with CANDIQUIK®, and this recipe dives right into baking with it!

This decadent version of chocolate cake is a little different than your average, missing a main ingredient, but I bet you won’t mind. Gorgeous cake that any chocolate lover will fall in love with!

Gluten-Free Chocolate Cake

It starts with 8 simple ingredients…

1 package chocolate Candiquik - 1 cup plus 3 Tbsp butter – 1/2 C sugar – 6 eggs - 1 cup unsweetened cocoa powder -1 Tbsp milk - 1 Tbsp honey - 1/4 tsp gluten-free vanilla extract.

Preheat over to 375 degrees F.

Spray a 9-inch (I used a 12″ because it was all I had!) spring form pan with nonstick cooking spray, then line the bottom with a circle of parchment paper. Spray the paper with cooking spray too, then set the pan to the side – and now time for the good stuff :)

Place 1 cup (2 sticks) of butter (cut into chunks) and 8 oz (half of the 16oz package) CANDIQUIK in the heat and serve microwaveable tray (put remaining CQ in separate container/bag). Microwave on high for 45 sec- 1 minute, stirring often, continue in 15 sec increments- if necessary, until melted and completely blended. Do NOT overheat Candiquik.

Looks like it needs a bit longer!

There we go – this is how it should look!

Now pour the CANDIQUIK and butter mixture into a large bowl. Add sugar and mix well.

Add an egg…

and repeat…


one at a time… 


Whisking well after each one.

And after all 6 eggs… it will look like this! Or it should!

Next — sift cocoa into the bowl

and stir until just blended

Keep stirring…

Once blended, pour the batter into the prepared spring form pan.

…and bake for 35-40 minutes, or until cake has risen and the top has formed a thin crust. The cake should be just firm in the center when done.

Cool for 10 minutes, then invert onto a plate by removing the sides of the spring form pan.

You can also throw away the parchment paper – set the cake aside to cool completely.

In the mean time – we are going to make the chocolate glaze!

Break apart two squares from the unused CANDIQUIK (you will have 2 squares left-over after you use these) and 3 tablespoons of butter in a small saucepan over medium low heat -  stir until smooth.

Remove the glaze from the heat, then stir in vanilla, honey, and milk. Set aside to slightly cool off.


When the cake has cooled, pour the glaze onto the center and use a spatula or the backside of a spoon to smooth the glaze along the top and sides of the cake.


Chill the cake in the refrigerator, uncovered, for 30-60 minutes before serving to allow the glaze to set and it will also make the cake much easier to slice!

And finally, you can add  raspberries, strawberries, powdered sugar, whipped cream…you get the idea! Yu-Um!