
These are cute as a bug’s ear!
I made these bugs, let me re-phrase – LADYbugs (much classier) - a couple weeks ago and I’ve been super pumped to show you. I hope you like. I do.
Ladybug Cake Balls (adapted from Austin Cake Ball)
Yield: approximately 36 ladbugs
- 2 packages (16oz) Vanilla CANDIQUIK Coating
- Red food coloring (oil or powder based only)
- Black food coloring (oil or powder based only)
- 1 box chocolate cake mix (plus ingredients for cake mix)
- 1 container (16 oz.) chocolate frosting
- Black cake icing writer
Alright – so bake yourself up a nice cake. I made chocolate. With chocolatey fudge frosting. Or you could totally do white cake, yellow, strawberry, pumpkin, german chocolate, brownies(!?)… you get the drift.
Once your cake is done baking, let it cool a bit.
Crumble the cake into a large bowl and mix with frosting.
Let the mixture cool in the fridge for a couple hours. You’ve made cake balls before, right? If not, check out my tutorial for cake pops/cake balls.
Ok, now roll this mixture into 1″ balls and place on a baking sheet lined with wax paper. (I’ve been using a coffee scoop to spoon out my cake ball mix and it works like a dream; nicely sized, uniform cake balls)

Melt 1 package of Vanilla CANDIQUIK Candy Coating according to package directions. Add a few drops of red (oil or powder based) food coloring until desired color is established.
With a spoon, dip cake balls in melted Red colored CANDIQUIK, coating completely. Let excess CANDIQUIK drip off and place to dry on a baking sheet lined with wax paper.
Melt the remaining package of Vanilla CANDIQUIK according to the directions on the package. Add a few drops of black (oil or powder based) food coloring until you get a nice black.
Make sure your red cake balls are dry and with your hands, carefully dip about half of a red cake ball in the black CANDIQUIK, letting the excess coating drip off, return to wax paper. Before the black coating is dry, place two confetti sprinkles on as the eyes (if you want to add a pupil: using a toothpick, dip the tip in the black Candiquik and dot in the center of the white sprinkle).

Once coating is dry, starting at the red coating, draw a line down the middle of the cake ball with black cake writing icing.
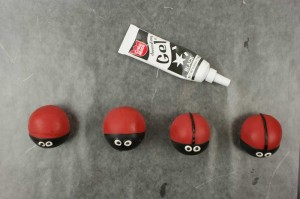
Then draw on the dots for the ladybug (you can use the cake writing icing/gel or the toothpick/candiquik method)


Pretty straight forward. And those googly eyes will melt your heart! Happy Baking!


Thank you so much for sharing this. My daughter will be two in September and I want her party to be ladybug themed. These will be great as favors. Hope they look as great as yours! I have PLENTY of time to practice though! lol
SOOOOO CUTE!!!!! Sounds time consuming, but when I have a FREE day, I’m gonna try these little buggers!!!
Thanks Kay! Yes, cake balls are a bit time consuming, but it really helps if you can bake the cake, mix w/ frosting and roll into balls one day. Then dip and decorate the next day
I’m sure yours will turn out great!
They are soo cute!
too cute! what brand of food coloring are you using? i am having a hard time getting the right color red… THANKS!!
Hi Amanda, I used a brand called Opatint by Colorcon – not sure if it is available to consumers
I would suggest trying Country Kitchens though – they have their own brand and sell many others (online). Also, if you find that the CandiQuik thickens after adding the food coloring, thin it out by adding a spoonful (or more) of Crisco solid vegetable shortening. Hope this helps! Thanks for stopping by.
thank you!
How do you get your cake bites to stay in their nice round shape when rolling them in the red candiquik? Mine get all gloopy and I can’t remember where the “flat” side was supposed to be and so it ends up being on the side or top when the red dries. Help!
Hi Stephanie,
it’s really about the way you dip them. So once you’ve rolled them into perfect little balls, use this method (quick video) for dipping them:
Hope this helps! Let me know if you have any questions. -Sarah
Just made these for a bake sale. You should have noted that the gel never dries, because now I have a packaging problem! I should have used more melted chocolate/candy melts. Darn.