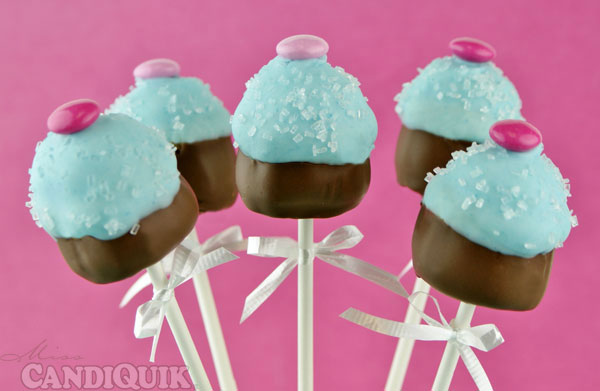
Have I told you how much I love coffee?
I keep a pitcher supply of this coffee in my fridge at all times during the summer months.
I’m also usually one to experiment by buying those fancy creamers at the grocery store.
Caramel Macchiato!
White Chocolate Mocha!
Irish Creme!
Almond Joy!
Italian Sweet Cream!
York Peppermint Patty!
Gingerbread Latte!
Belgian Chocolate Toffee!
Not so “!!!” once I get them home. I’m a plain ol’ half & half kinda girl. Nothing beats it.
Ok, heavy whipping cream and sweetened condensed milk come close, but I almost always regret buying the ‘fancy’ flavored creamers.
Well I have a solution….mix that fancy coffee creamer with CAKE, duh. Then make cake pops.
You know what this means!? Like a 1,000 more combinations for cake pop flavors! Not to mention, a ‘lighter’ and slightly less sweet cake pop.
I used caramel macchiato flavor with yellow cake. The caramel here was hardly recognizable, but the cake pops were a hit.
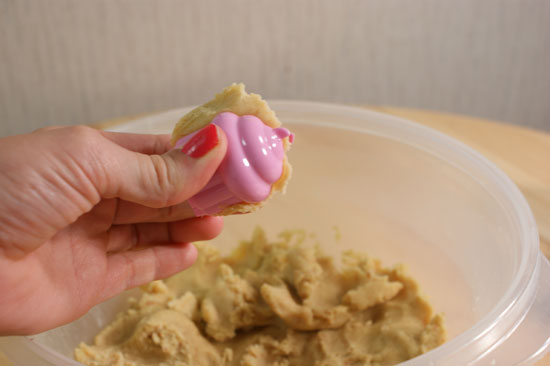
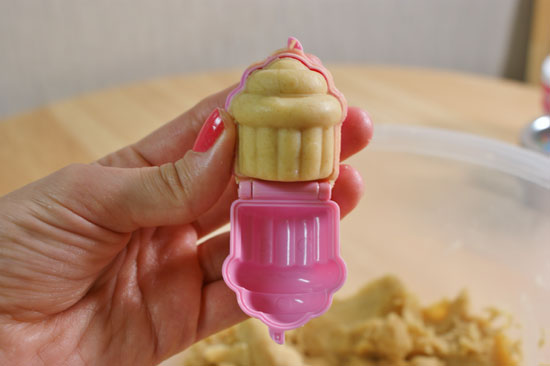
The mold I used was from My Little Cupcake. They’re great because they give you perfectly consistent shapes and sizes of pops, every time and they come out of the mold really easy, too.
- 1 box cake mix (+ ingredients required for cake)
- 1 package Vanilla CANDIQUIK
- 1 package Chocolate CANDIQUIK
- ¼ cup coffee creamer (your choice of flavor)
- Blue oil-based food coloring
- 1 My Little Cupcake Mold
- Bake cake as directed on box.
- Crumble cooled cake into a large bowl and add ¼ cup coffee creamer to cake and mix thoroughly with your hands. Chill mixture in fridge for 30 minutes.
- Grab a healthy handful of cake mixture and roughly form it into a nice big blob. This creates a smooth surface when being used with the mold.
- Squeeze the mold completely shut so that all of the excess cake mixture is forced out of the mold.
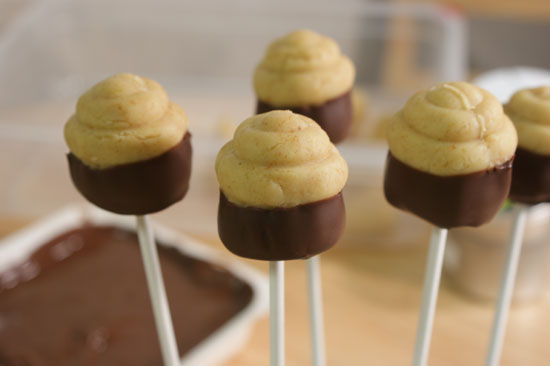
- Melt chocolate CandiQuik according to package directions.
- Carefully dip the bottom of the cupcake into the melted chocolate CandiQuik, let the excess drip off – then insert the lollipop stick. Place in a Styrofoam block or cake pop stand to dry.
- Melt vanilla CandiQuik according to package directions. Add blue oil-based food coloring until desired color is reached.
- Dip top of cupcakes in vanilla CandiQuik and decorate with sprinkles. Return to Styrofoam block or cake pop stand to dry.

Happy Baking!
Please let me know what you think of the coffee creamer substitute in the cake pop recipe!!
Linked to the following parties: Mrs. Happy Homemaker, Crazy for Crust, Bru Crew Life, Something Swanky, Chocolate, Chocolate & More, Sweet Bella Roos, Kitchen Fun w/ my 3 Sons


The Duncan Hines Frosting Creations are powder, correct? I was curious how well those mixed with the chocolate. Guess I’ll have to play around with these.
I have the cupcake mold and yes, I would LOVE for a football shaped one. Would make things so much easier with those orders.
Hi Alicia,
Yes, they are a powder! They mix pretty well with the coating!! They do leave tiny, tiny little specks of color (as you can probably see in the photos), but they work great…just mix well and you’re good to go!
Those are beautiful! And I totally want one of those mini cupcake mold thingies. It’d make my life so much easier!
Hi Hayley,
They are awesome!! And they have other shapes too. Keep an eye out….I might know of someone giving some away soon ;). Shh
LOVE these! Can’t wait to try them.
Hi Christi, so many flavor combinations!! I can’t wait to try peppermint creamer with chocolate cake
I love that you used the coffee creamer! SO yum.
Hi Dorothy! Thanks for stopping by
Very cute… I’m a sucker for flavored coffee creamers!
Thanks for saying hi, Hollie!
so adorable!
I’ve GOT to have some of these! I found you through Something Swanky!
Hi Rose! Thanks for stopping by…I was so excited when these pops were a success.
Do you not decrease your water in your box cake receipe when adding the additional liquid creamer? I will try this. Always looking for new gormet flavors for my Cakepops. thanks for sharing. K.
Hi Kim – Thanks for stopping by! The coffee creamer is not added to the cake batter prior to baking. The creamer is replacing the frosting that is normally mixed with cake to make cake balls.
What a fun idea to use the coffee creamer in place of the frosting!!! And those little molds for the pops? Adorable!!! I need to find those!!!
Hi Jocelyn,
I love that using the creamer worked! And yes, the molds are awesome….why didn’t I think of them!?
LOVE these adorable little Coffee Creamer Cake Pops! I’ve seen recipes calling for half n half. Love this idea! Thank you so much for sharing on Thursday’s Treasures Week 47! <3 and hugs! http://www.recipesformyboys.com/2012/08/thursdays-treasures-week-47.html
Thanks Debi!
If I understood correctly, once you crumble the cake you add only 1/4 of coffee creamer and you mix it well to form the cake pops without anything else. Is it correct? Please clarify. Thank you.
Hi Salpie, Thanks for stopping by!
You got it! Mix the 1/4 cup of coffee creamer with the (baked) crumbled cake, then roll into balls and dip in the coating.
Hi!
Thank you for sharing your ideas. your a genius!!!.I love all your recipes
By the way just want to ask what is a good option aside from using candiquick we dont have it here in the Philippines. =(
since the creamer need refrigeration after opening, how long do the pops keep? (outside the fridge)
thanks, great idea. (i’ve used vanilla pudding instead of frosting and it also works great, slightly less sweet)
Hi Jazibe, just to be safe, I would only keep them out when serving (a few hours). Otherwise, I’d keep them refrigerated due to the creamer. Thanks for stopping by!
these sound (and look) gorgeous. I may have to do an international shop just too give these a go, who cares bout the crazy shipping costs would be totally worth it too give these a go x
Hi Tash,
Thank you for your kind words!! Happy Halloween
Hi Sarah,
I came across your site from Love From the Oven’s site. I don’t have the cupcake mold yet, but wanted to find out if you had to grease the mold so that you were able to take the cake mixture out?
Thanks.
Hi Candice, thanks for stopping by! No, you don’t have to grease the mold at all, it pops right out, I didn’t have any problems with the cake ball mixture sticking!
Using the flavored coffee creamers is such an awesome idea. Personally I find the original (cake and icing mixture) too sweet so I am anxious to try this. And where do you find those darling molds? I would love to get my hands on some. Thanks for all your wonderful ideas.
Hi Linda,
Thanks for stopping by! If you click on the link for the My Little Cupcake molds (listed in the directions), it will take you to their website where you can purchase. And yes, you have to try the coffee creamer!
They are fabulous, Sarah. Love, love, LOVE coffee and cake pops, so it’s always great (though surprisingly rare) to see them meshed together. I posted a hat tip about the recipe at my site.
Kate.
Thank you so much for sharing!
I have recently been experimenting with the flavored coffee creamers. OMG! I use the creamer in place of water, add an extra egg, and follow the remainder of the recipe. I can then add a little creamer, etc. to the already baked cake for added flavor and moisture. They come out fantastic. The number of flavors are unlimited. I’m always adding a little extra something to the batter for even more texture when eating them. People love them.
This is a great idea! After all, cream is wayyy better than water, haha. Thanks for sharing your tips!